
PAS · EM133-XM memory and interval logging
Set up periodic data logging with a basic setpoint
A periodic logging setup needs a destination file, a list of recorded parameters and a trigger that tells the meter when to record. Teach these together: MINUTE INTERVAL supplies the timing and DATA LOG #1 supplies the logging action. The chosen interval does not by itself establish NEM metering compliance.
Source-reviewed draft; live reconfiguration and recording release pending.
Before you start
- Back up the current configuration. If changing record contents or memory allocation, upload and reopen the required historical-log archive first.
- Confirm the intended recorder and inspect every existing setpoint before changing one. Do not overwrite an alarm or control function to follow the example.
- Confirm basic configuration and the meaning of the selected quantities. Logging tests establish communication and record behaviour, not measurement accuracy.
Choose what the record contains
Open MeterSetup > Memory/Log > Data Recorder and select the intended conventional log. Choose the parameter names and check their units. Confirm that the file allocation has enough parameter slots and record capacity.
Cumulative energy, instantaneous power, block demand and sliding demand answer different questions. Choose the quantity for the task rather than assuming every power-related field represents interval energy.
The XM datasheet specifies up to 16 parameters/channels for interval recording. Each logging action creates a record containing the selected values. Inspect Data Logs 1, 2 and 3 separately, then their Log Memory allocations; a longer parameter list is not a faster recording interval.
Inspect the existing recorder
Read the selected log number, name and current parameter list. Keep a copy before editing. If the change affects allocation or retained history, complete the archive-before-memory procedure first.
Select the intended parameters
Set the Group and Parameter fields within the allocated count. Preserve import/export direction and units in the lesson notes. Save the intended recorder setup locally for review.
Link the interval trigger to the log action
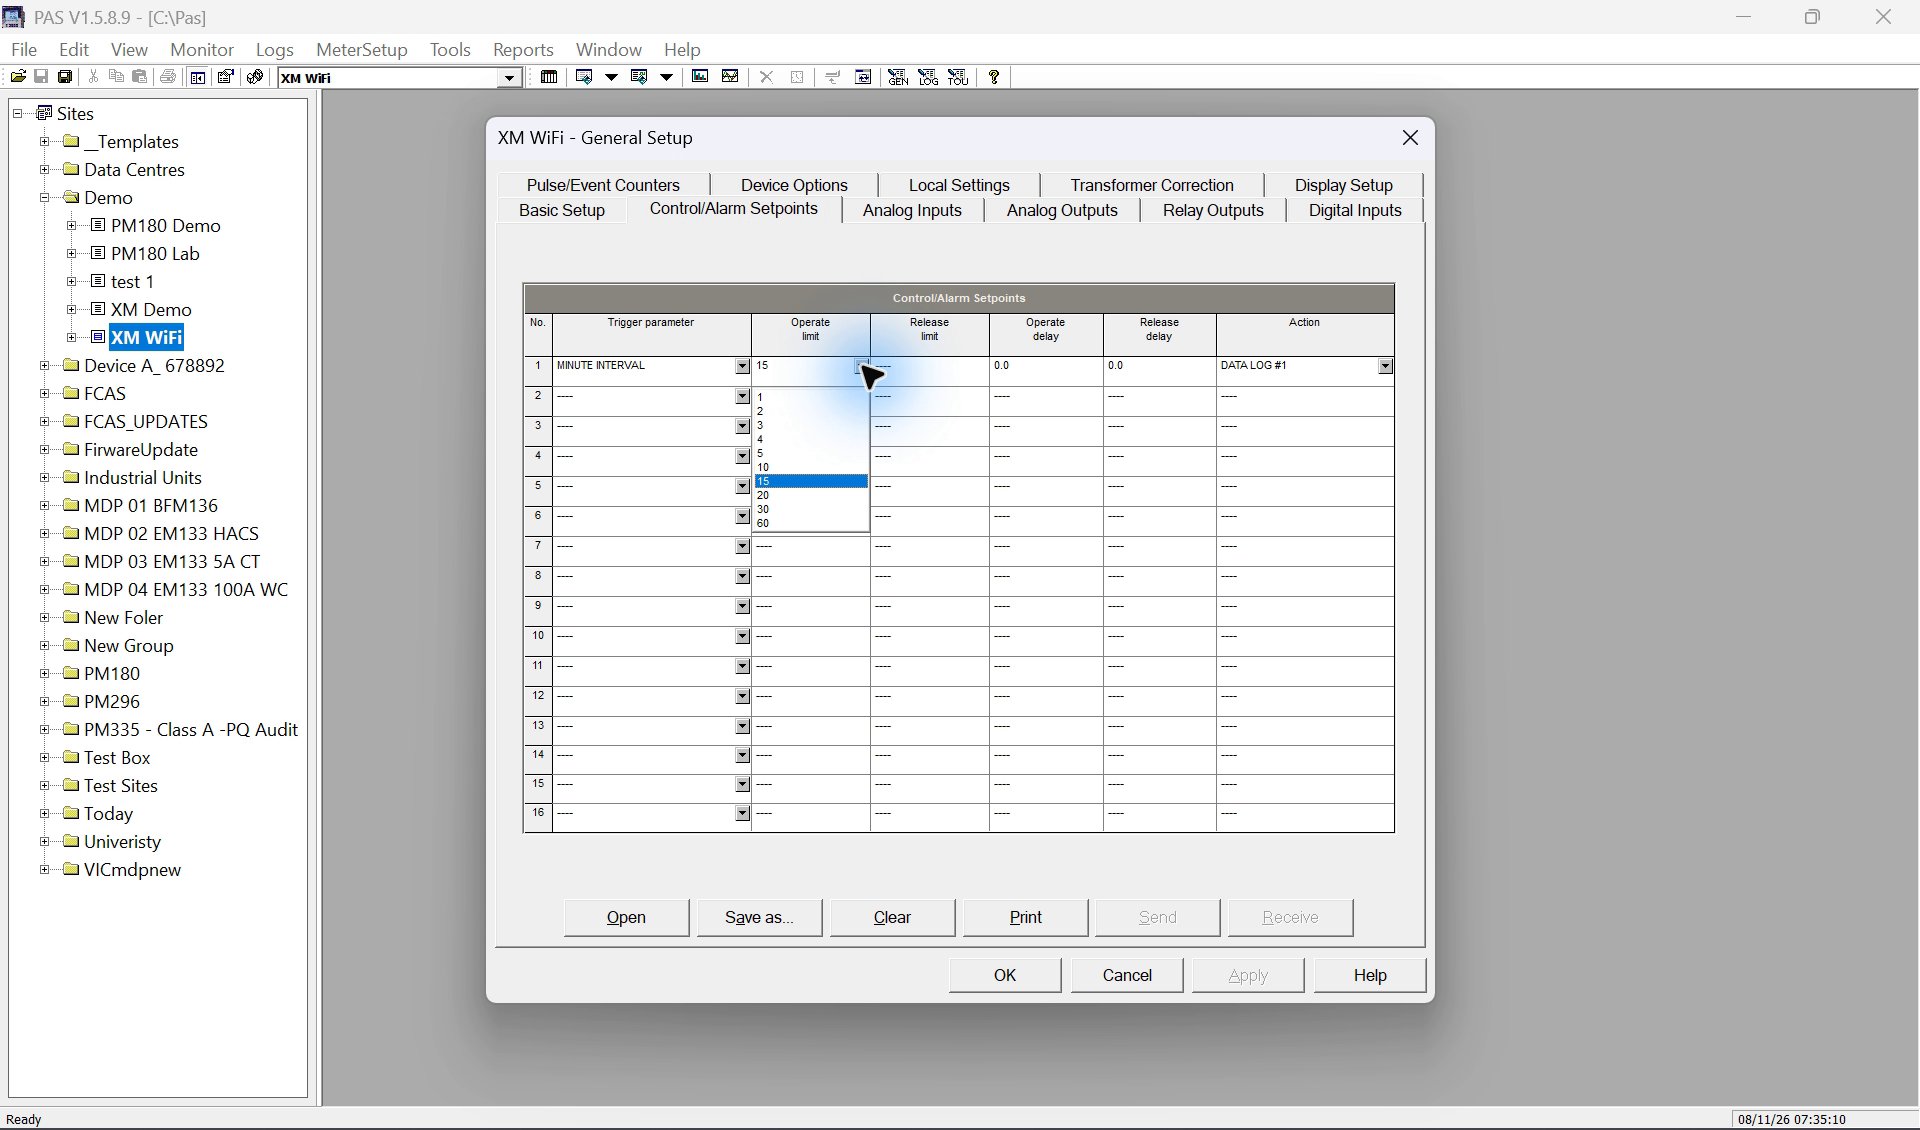
Open MeterSetup > General Setup > Control/Alarm Setpoints. Inspect the existing logging row. The manufacturer describes Setpoint 1 as the base-model default for periodic Data Log 1 recording; the selected site's existing purpose must still be checked.
Interval choices in the manufacturer guide include 5, 15 and 30 minutes. The following values are instructional alternatives, not claims about the meter's current settings.
Select the periodic trigger
On the reviewed demonstration logging row, select MINUTE INTERVAL as Trigger. Use the interval's Operate limit field to select the intended supported minute value. Confirm the field label and available choices in the installed PAS version.
Select the logging action
Choose DATA LOG #1 as Action for this lesson's destination. Do not select a relay, counter or notification action as a substitute. Preserve unrelated setpoints and actions.
Review the rest of the row
Inspect Release limit and operate/release delays. The interval example is not an analogue threshold exercise: do not add arbitrary release thresholds or delays. Compare the complete row with the reviewed configuration before sending.
| Instructional logging interval | Trigger | Operate limit | Action |
|---|---|---|---|
| 5 minutes | MINUTE INTERVAL | 5 | DATA LOG #1 |
| 15 minutes | MINUTE INTERVAL | 15 | DATA LOG #1 |
| 30 minutes | MINUTE INTERVAL | 30 | DATA LOG #1 |
Find the trigger, action and parameter lists
Keep the manual beside PAS. Near the end of the EM13x Installation and Operation Manual, Appendix D lists Setpoint Triggers and Actions: Table 25 begins at printed page 169 (PDF page 172), and Table 26 is at printed page 172 (PDF page 175). Use these to distinguish the condition that starts an action from the action itself.
Appendix E, Parameters for Data Monitoring and Logging, starts at printed page 173 (PDF page 176). Table 27 pairs PAS abbreviations with their meanings and groups. Find the Group first, then the Parameter; check units and whether the quantity is instantaneous, demand or accumulated energy.
Return to MeterSetup > General Setup > Control/Alarm Setpoints to inspect the trigger and destination, then MeterSetup > Memory/Log > Data Recorder to inspect recorded fields. The older family action list does not enumerate every XM destination, so compare it with the selected model’s actual PAS choices.
Keep logging cadence separate from demand periods
Basic Setup has its own power demand period, sliding-demand block count and volt/ampere demand period. Changing MINUTE INTERVAL changes the recording cadence; it does not automatically change those calculations.
Illustrative example: recording a fifteen-minute demand value every five minutes still records that demand calculation, not a newly defined five-minute demand. Likewise, an instantaneous kW sample is not interval kWh. Use the separate NEM interval lesson to check the required energy data, time basis and application obligations.
Verify configuration and actual records
An offline save demonstrates the intended configuration. It does not demonstrate that the meter accepted it or generated a record.
Save and review the complete setup
Save the intended recorder and setpoint configuration locally. Confirm the target site, log destination, chosen interval and expected retention before an authorised live change.
Send only the intended change and read it back
For an authorised connected demonstration, send the reviewed setup to the intended meter. Receive the settings again and verify the Trigger, interval value, Action and recorder contents. A send-success message alone is not the readback check.
Wait for successive records
Allow the chosen intervals to occur normally. Do not move the PC or meter clock to manufacture a demonstration. Use Logs > Upload Logs to retrieve the resulting records.
Inspect timestamps and fields
Open the retrieved log and compare successive timestamps, spacing, parameter names and units. Check the intended boundary alignment and note clock changes or missing records. Revisit allocation if the chosen interval reduces retained history below the requirement.
Pro tips after the menu workflow
Use a clear log name so the report identifies its purpose. Keep pre-change and post-change archives distinguishable when recorder contents change.
Inspect every setpoint that can record to the destination file. Extra event-triggered records can make the file fill faster than a periodic-only retention estimate.
Teach the menu path first. Add keyboard accelerators only after they have been demonstrated in the installed PAS version.
Limits and checks
- This written lesson does not claim a live interval change, successful programming or newly generated interval records.
- An offline PAS inspection on 8 November 2026 confirmed the MINUTE INTERVAL trigger, interval entry, DATA LOG #1 action and relevant tabs. Offline values are saved site information, not fresh meter readback; no change was saved or sent in that inspection.
- Exact timing after configuration changes, clock adjustments and daylight-saving transitions must be verified for the actual device and application.
- Selecting a supported logging interval does not establish AEMO acceptance, NEM compliance, meter approval or suitability for settlement. Those requirements are assessed separately.
Check your understanding
Which action belongs to this periodic logging example?
Does changing MINUTE INTERVAL change the power demand calculation period?
What proves that the intended interval is operating?
Sources
- Source 1. EM13x Installation and Operation Manual — control/alarm setpoints (opens in a new tab)
Printed pages 106–108 / PDF pages 109–111, section 5.2.7 and Figure 5-12; printed pages 171–172 / PDF pages 174–175, Appendix D
General family menu route and trigger/action definitions; inspect the selected XM setup before editing.
- Source 2. EM13x Installation and Operation Manual — data recorder and periodic default (opens in a new tab)
Printed pages 122–124 / PDF pages 125–127, sections 5.5.3–5.5.4
The documented default links Data Log 1 to a clock-based MINUTE INTERVAL setpoint; this does not establish the current site's setpoint purpose.
- Source 3. EM133 / EM133-XM Modbus Reference — periodic triggers and logging actions (opens in a new tab)
Printed/PDF page 15, Data Log File; pages 79–80, trigger and action definitions
Supported minute intervals include 5, 15 and 30; Data Log #1 is a documented action.
- Source 4. EM13x Installation and Operation Manual — Basic Setup demand periods (opens in a new tab)
Printed page 95 / PDF page 98, Table 8; printed page 97 / PDF page 100, prerequisite note
Demand-calculation periods and sliding-window block count are distinct settings. Correct basic wiring and transformer settings are prerequisites for interpreting measurements.
- Source 5. PAS Getting Started — save, send and retrieve (opens in a new tab)
Printed/PDF page 10, chapter 3; pages 21–22, section 6.1; page 30, section 7.5
Local saving, device programming and historical-log retrieval require separate checks.
- Source 6. EM133-XM datasheet — interval recording capacity (opens in a new tab)
TBV1.1, PDF page 2, Event and Interval Data Recording
XM-specific datasheet lists up to 16 parameters/channels. Older family and unified-protocol tables list nine; confirm the selected model, firmware and PAS allocation before changing a file.
- Source 7. EM13x manual — setpoint and recording reference lists (opens in a new tab)
BG0491 Rev. A15, Appendix D printed169–172/PDF172–175, Tables25–26; Appendix E starts printed173/PDF176, Table27
Use family tables to interpret PAS abbreviations. The older action table lists Data Log1; additional XM destinations must be checked in the selected XM setup.
Revision and review details
| Revision | Change and reason | Review / supersedes |
|---|---|---|
| 20261108-draft-v1 8 November 2026 | Added periodic-trigger examples and configuration/record readback checks. Teach the recorder, interval trigger and logging action together while separating demand periods and NEM requirements. | Manufacturer source review complete; connected programming and new-record verification pending. None |
| 20261108-retention-v2 8 November 2026 | Clarified parameters per record, per-file allocation and retention; added sequential log navigation and manual-reference guidance where relevant. Connect the displayed recorder settings with practical memory planning. | Manufacturer-source review completed; no new footage or live changes claimed. 20261108-draft-v1 |